If you’ve been involved in tvOS application development, or you’re new to the whole process, you might find this post interesting in regards to user interface.
I have recently been involved in tvOS dabbling. I’ve been creating a custom application (no TVML) and I wanted one of those nifty parallax-style buttons that Apple uses in its media browsing (notably the TV application). You can focus an item and it will shift neatly as you move around on the Siri remote control. Perfect if you don’t need to include explanatory text. However creating one eluded me for a short while. There may be a better way to handle this, but I present to you my working solution.
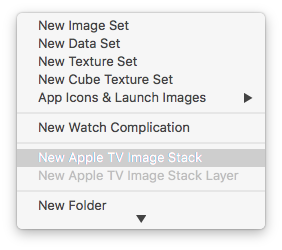
Create an Apple TV Image Stack
You need to create a new Apple TV Image Stack in Xcode (when you have your Assets.xcassets folder selected).
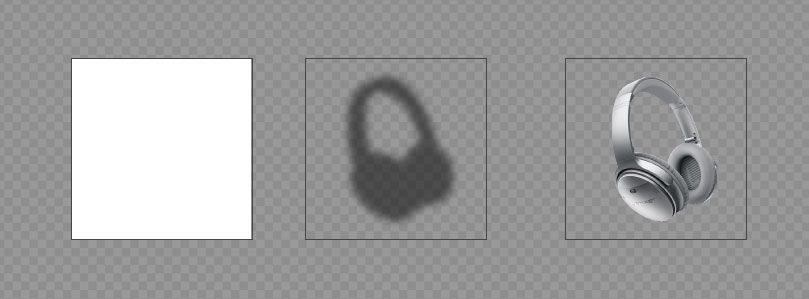
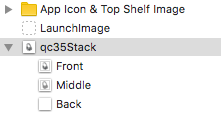
The stack takes 3 files by default. I used a background white PNG, a shadow PNG, and a product PNG. If you don’t supply a solid background image, you’ll see the shadow behind your UIButton – which doesn’t look good. Drag in your images into each layer (Front, Middle, Back). You’ll get a nice preview of the parallax at the top so you can see how your images work together. This allows for you to determine if you need to make changes to get the look that you want. I’ve shown each image at the top of this post, each box representing one of them. I named mine “qc35Stack” – which you’ll need to refer to later as an image name.
Create your custom UIButton with parallax
Now that you have your image stack, you can use it to supply images for a UIButton’s various states. When you supply a stack in this way, the button will know that it should perform a parallax presentation. I created the 3 images at the same size that I want the buttons to be (i.e. the image sizes match the UIButton’s declared frame).
Here is the code I settled on.
let buttonUnpressedTexture = UIImage(named: "qc35Stack")
let buttonPressedTexture = UIImage(named: "qc35Stack")
let newButton = UIButton(type: .custom)
newButton.frame = CGRect(x: 800, y: 200, width: 180, height: 180)
newButton.setImage(buttonUnpressedTexture, for: UIControlState.normal)
newButton.setImage(buttonPressedTexture, for: UIControlState.highlighted)
newButton.setImage(UIImage(named: "qc35Stack"), for: UIControlState.focused)
newButton.imageView?.clipsToBounds = false
newButton.imageView?.adjustsImageWhenAncestorFocused = true
newButton.adjustsImageWhenHighlighted = true

Finished.
A note: I first attempted to use static PNG images for the highlighted and normal states of the UIButton, but the transitions between them and the focused were glitchy and didn’t look good. When I used the same stack for each of those states, things look good. I don’t know if this is the correct way to do it or not, but it is working.
Go ahead and try it out for yourself. It seems to work a treat, and you didn’t need to subclass a UIButton in your own Class to get it working either.
A short post because the solution is pretty simple.